

The
Pakon F135 Plus is a 35mm film scanner. The original version was available in 2004, the plus version was released in 2006. The plus can scan at a higher 3000 x 2000 while the original version can only scan to 1500 X 2250.
HistoryPakon, Inc. was based in Minnetonka, Minnesota in the United States. It was formed in the mid-1980's from the previous company known as Pako, which for more than half a century was known as a supplier of photographic slide mounts and mounting equipment primarily for the photofinishing / minilab market. They formed their Impak branding in 1996 to be used for their scanners. Earlier roll film scanners such as the Impak DIS-100, DFS-100, DFS-200, F6 and F12 were released. In 2001, Eastman Kodak acquired Pakon, but was operated as a independent subsidiary of Kodak. Afterwards models such as the F235, F235C, F235 plus and F335 were released.
The F135 scanners was also distributed and branded by
Kodak (for Kodak APEX dry lab),
HP (HP RPS lab),
Nexlab and
Phogenix (a scraped HP and Kodak project for inkjet minilabs). It is often integrated in many turnkey photofinishing systems from various vendors such as chemist, and print shops. It can operate in a stand alone method, so it can be used as a addition to older non digital minilabs. It was primarily marketed for producing scan CD's like Kodak Picture CD.
Currently (2014-)
The mass market consumer shift to digital capture has reduced the need for minilabs and film scanners in every major street corner chemist shops. Many of them have been decommissioned over the past few years. I bought mine originally in Brooklyn, New York for $200 from a company dealing with surplus minilab equipment. A additional unit was bought from AAA Imaging. Since it was mostly designed for stand alone operation it can easily integrate into an existing photographers hybrid photo environment. This is also a great option for traditional photographers to quickly proof their negatives for enlarging. The F135 was designed specifically for 35mm film, and unlike other multi-format minilab scanners it does not require any adapters, loading film onto spools or other misc parts which can be difficult to locate or expensive to find second hand. Many minilab scanner systems require a software reinstall or modification on the controller/processor computer in order to operate without a printer. The included software, though odd is simple and often less complex to use compared to most digital minilabs like Fuji Frontier S, Noritsu EZ controller, and Kodak DLS, etc.
Compatibility supportIt is no longer supported by any manufacturer as Pakon was shuttered in 2008. It does not work with current computer operating systems. It is designed for Microsoft's Windows XP. Use of an older computer is strongly recommended, but there is some success using VM (Virtual Machines) software on more current operating systems on both Windows and Mac.
Minimum system requirements are 2000-2008 era PC using a Pentium III 700 MHz MMX or higher CPU, 4GB free hard drive space, 256 MB of RAM, and USB 2. Running Windows XP, .net 1.1, and a screen resolution of 1024x768 or higher. Newer faster computers may still work, but some newer systems may not have older drivers compatible with Windows XP.
DescriptionThe scanner is very odd looking, looking somewhat like a dog dish, or electric vegetable chopper. The F135 is very fast. Again, one of the contributing reasons is that it does not use any film holders. Film is fed through a slot on the right side and exits to the left with the scanned film resting in the built-in bin. The front of the bin curves downward, I find this useful for resting the palm of your right hand while feeding film

, but was mostly designed to easily retrieve the scanned film. The films lighting source now uses a LED based system instead of the 50-watt SoLux halogen type bulb of Pakon's F235 series scanners that need to be replaced periodically. The unit weighs 4kg and dimensions are at 317 x 343 x 406mm.
The included power adapter is similar to the type found on most portable computer laptops or other electronics. It is a multi voltage region brick and accept voltage from 100-240C~1.8A, with 50-60Hz with outputs of 15V at 4.0A. The connector is positive in the center and negative outside. The outlet is a C14 type male plug, so a removable C13 female lead plug is required on the adapter end and your regional household plug on the other end. Since a majority of these units were removed from American labs, they typically include a NEMA 5-15 plug which is two flat parallel blades with a third round earth pin.


The top of the unit has status diodes for power, lamp and film. These LED are an important part of the system and can blink, as well as change from green, red, yellow state.
LED| Power LED | | Middle LED | | Right Film LED | |
| Green | On | Green | Scanner ready | Green | Scanning |
| Off | Off | Blinking Green | Scanning | Blinking Green | Insert film |
| | Blinking Yellow | Unable to scan | Blinking Yellow | Remove film |
| | Blinking Red | Scanner Error | | |

\
multiviews of scanner /
Software
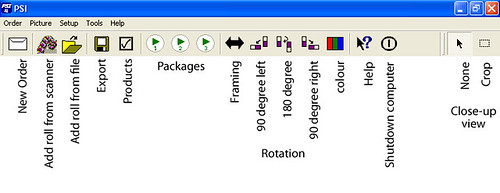
PSI
* Scanning: Feeding, Index number
* Views and controls: Toolbars, Interface
* Framing
* Export save, Archives
Part 2* IQueueIII, IQueue setup
* Products, contact sheets
* Package automation
* TLXClient Demo overview
Part 3* Scanning Panoramic
Setup
*
Install details - on a old Windows XP computer.
*
Install details - on VMware (Windows 7)
*
Remote connection - Connectivity to the old Windows XP computer from a modern computer.
*
Troubleshooting and tipsPSI
The scanning software is called
PSI IQ (Pakon Scanning Interface). There are two interfaces,
EasyOrder and
Classic view. Switch between them by clicking the
change view toggle button. It may ask for a password which by default is blank. This guide mostly focuses on the Classic view interface as it is indeed better for scanning your own work, while the Easy Order (when setup properly) is often better for scanning customer orders. The Easy interface also has larger buttons perfect for touchscreen monitors.

\
EasyOrder view /
Since it was designed for photo finishers, it may have printing options and features some end users might not have a need to use. The accepted films types are C-41 and B&W films. Early versions (before build 3.26) of the software can not work properly with black and white films. It is not natively compatible with E6 slide film at all. The files produced are 16-bit, RGB with a maximum resolution of 3000 x 2000 (automatically cropped to 2941 x 1960) at 300 DPI. Digital ICE can be used during scanning of C-41 colour films, enabling this does not increase the scan time very much compared to most scanners. It is able to scan 19 rolls an hour (24exp, at highest quality setting) or 15 rolls an hour with Digital ICE. Scanning strips increase time as you have to remove and reload each strip.
The scanner digitizes the entire roll/strips, the software recognizes the frames of each exposure. It does not capture each exposure like most scanners. Quality setting can be changed from 4, 8, 16 base (1500x1000, 2250x1500, 3000x2000). The software can also read the frame codes via OCR from the film; so multiple film strips on a roll can be scanned out of order and the software will reorganize it.
ScanningScans start by creating a new order session and pressing the
film strip icon (add roll from the scanner) button for each roll of film. The scans can be done with a full uncut strip, or in multiple strips of 4, 5, 6 exposure cut strips. A 3 exposure strip does indeed work but without DX code reading. Scanning multiple cut strips require more attention in the film strip orientation as well as to the LED's on the top of the scanner. When creating a new order select the number of frames on each strip, type of emulsion, resolution, and enter a Roll ID. I'd suggest using dust and scratch removal for C41 colour film; while disabling it for B&W. Wait for the scanner to warm up.

\
Adding a roll /

\
scan settings /
Feeding the filmPosition the DX code on top and lowest frame number first. Insert the film slowly to the slot on the right with the emulsion side facing you. Insert until the motorized rollers catch the film. Upon exit of the film ensure that the path is clear and that the film is rolled up into the front bin properly. This is essential for curlier non-flat films as they can sometimes jam up and cause an error in the feeding. Wait a few minutes for the scan to complete.
For film strips, insert the first strip to the slot on the right with the emulsion side facing you. When the first strip is finished, the right film LED will blink which means to remove the finished strip from the film exit path. Upon removal, the film LED's will change to green, but will continue blinking with the lamp's green LED ready for a new strip. Insert additional strips and repeat until the cut roll is complete and press the stop button in the software.
Index numberAs the system uses index frame numbers. Mixing strips from different rolls on the same order will often confuse the software with the exposure frames displaying out of order. Exposed film leaders can also sometimes confuse the software as they are often marked with frames in the 40-60 range, or XXX, XX, X and similar. When this happens after the scan session PSI complains via a pop-up warning dialog of index issues and can automatically rename all the frames with issues by pressing
index all. The duplicate frame numbers tend to be renamed xA. Example a duplicate frame 7 will be rename 7A, or if the frame is 7A, it is often rename to 7B or something similar. High number 50-60 frames tend to be shuffled to the end of the order, while the X's are usually in the front but again often out of original shooting order. If absolute frame index numbers are essential to your workflow, they can be manually changed by selecting the exposure frame and inputting the desired frame index. Pre-wind exposure cameras and upside down shooting cameras reverses the shooting order and or requires the orientation to be changed.

\
Index number /
Views and controlsToolbarsThe EasyOrder interface only has the status control toolbar while the Classic view has both bars. Most functions of the "classic" bar is within the EasyOrder interface, so no operations are missing.
\
Classic toolbar /

\
status control bar /
The interface can be configured so that strips can be displayed by the number of images horizontally. This makes it easier to organize as you can view them by common strip sizes of 4, 5 or 6 frames across, or a view all option.
\
Classic View | Print Qty | Horizontal adjustment /
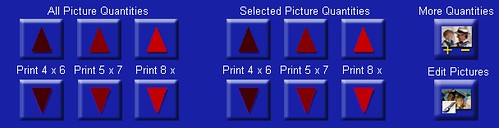
The main view is the
Print Quantities view. This is used to select the number and size of photos to be printed. It has three red coloured blocks below the frame for 4x6, 5x7 and 8x10. By pressing the More Quantities button this changes the print sizes to 3.5 x 5, 4 x 7 and 5 x 9.
\
Quantities view /

A
Edit view is also available with basic modifications including contrast, brightness and colour adjustments. Individual, multiple or all of the photos can be selected for modification. An additional
more edit options are available for converting photos to B/W (Normal/cool modes) and Sepia. Double click the frames to increase the size of that particular photo.

\
Edit view: colour correction, effects /
On the right of each frame are grey (brightness), white (contrast), red, green, and blue boxes (colour adjustments) with a number. These represent modifications done to the photos. 0 (zero) is no modification. In more "more edit effect mode", grey (saturation) and white (sharpness).
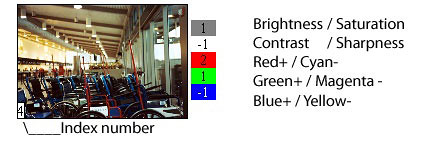
In this close-up view the top right has a
square tool that can be used for cropping. When the crop tool is selected, a eight pointed bounding box surrounds the photo. Modify these to adjust to the desired crop.

\
closeup view: crop /
FramingSince one long strip is scanned instead of each exposure, every once in a while a frame or two may be out of alignment. Mend this by using the framing tool to shift the image within the frame. Single or multiple photos can be selected for frame adjustment in edit view. Pressing the adjustment buttons will move the framing, not the photo. Example; pressing any of the right adjustment buttons will move the frame to the right revealing more of the photo's right side. This has the same effect as moving the photo within the frame to the left. It can also be adjusted in single closeup photo view. Sometimes the framing is very wrong on almost every photo, this is usually caused by the film leader or partially exposed frames. This can often be remedy by re cutting the negative leader.
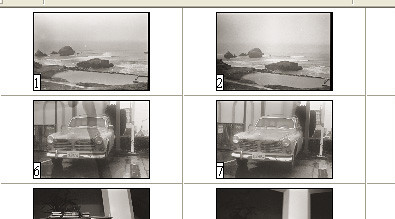
\
framing is incorrect on right side of the photos 1 and 2 /

\
Select photos and use framing tool <-> to shift frames left/
Export saveAll photos in the scan order are exported by pressing the export (floppy disc) icon. Photos can also be rejected and not included in the orders export. Rejected photos have a
X. Rejected photos can be included in the export by pressing the Accept button. Saving the export will convert the scan order into multiple files. Another method is to select the photos you want exported and in the Export dialog check Selected Pictures only.
The default directory for the saved files is in the Pakon program files. You can choose your preferred location as in any other program, but this will reset to the default once again after each launch session of PSI. Pressing Create subdirectory with each Roll ID; will make a folder directory based on the roll ID with the exported files within. You can add a prefix to the file names during export, so instead of a file name of "AA001" (for photo index number 1) you can add any prefix such as "NIKF3-" and the file will be named "NIKF3-AA001". There is a Save as Raw option, but when used will not retain any modified settings like contrast, brightness, colour settings that were generated by the PSI software.
In the Image Settings tab you can select the output file format in TIFF, JPG, and BMP. If a JPEG setting is chosen, the quality of the compression can also be adjusted and the estimated file size is also displayed. A EXIF JPG format can also be selected, this adds Camera maker "Pakon, Inc" and Camera model "F135_PLUS" to the file information. The dimensions can also be adjusted. The default is Use scanned resolution, which is the resolution set during the beginning of the scan order. If this is unchecked you can scale or downsample the dimensions. When the Don't scan up option is checked the photos can only be decreased.

\ Export control /
| 
\ Save options /
|
ArchivesArchives of queued orders are located in the
drive: IQueue\Archive directory. This makes it handy to retrieve older order sessions without having to rescan. This can be used if you forget to create products, or if you want to export additional photos after a partial roll export. It can be accessed in PSI by going to the
Order menu and selecting
Add Roll From Archive... This brings up a search window to find the order. Searches of inquires such as Roll ID, date and time can be accomplished. Select from the results and open the archive for import into PSI.
Note:If scanning many orders, sometimes this archive grows very large and consumes a lot of hard drive space. Horizontal frame adjustment cannot be done with archives as they are separate files.

\
Archives search /
END OF PART 1continued,,, below


